
how to make a willow wedding arch?
To make a willow wedding arch, you will need to gather several long and flexible willow branches. Start by bending two of the branches into a half-circle shape and secure them together at the top with floral wire. Repeat this step with two more branches, making sure they are the same length and shape as the first two.
Next, connect the two half-circles together at the top with more floral wire, creating a full circle. Continue adding more willow branches to the circle, weaving them in and out of the existing branches to create a sturdy structure.
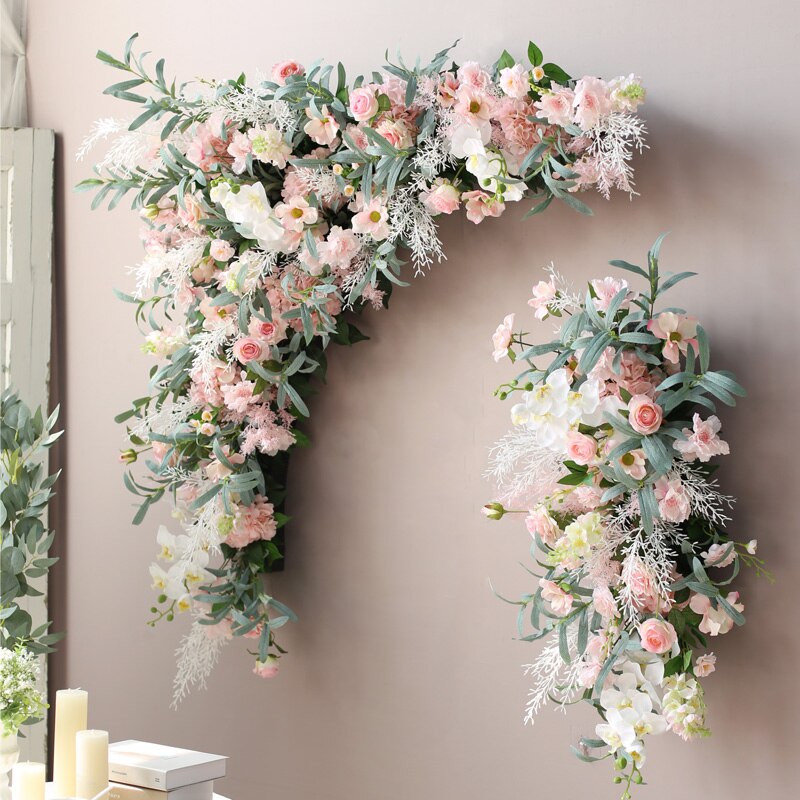
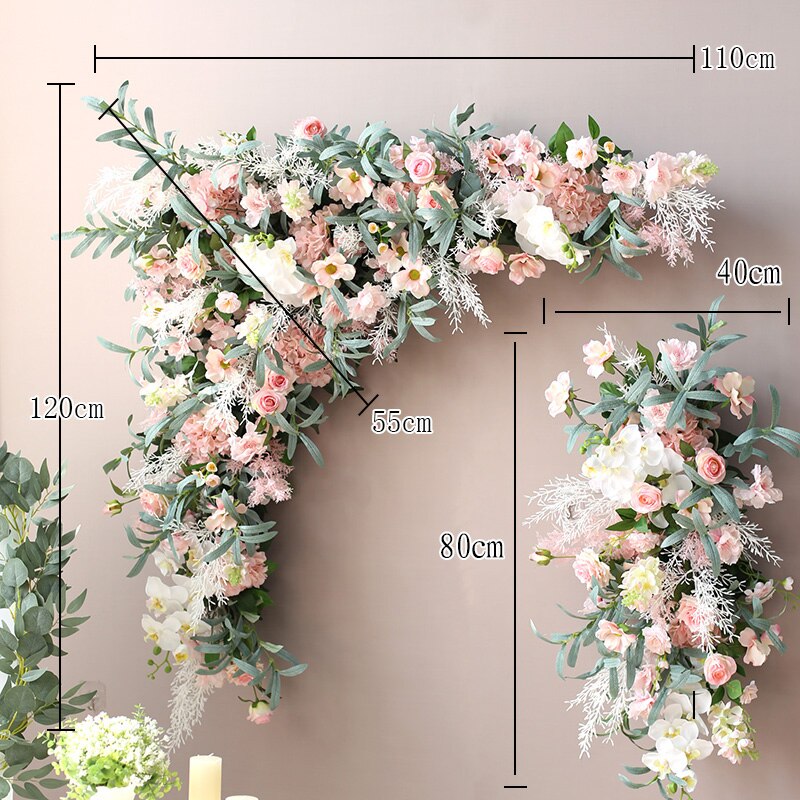
Once you have the desired shape and size, trim any excess branches and secure the ends with floral wire. You can then decorate the arch with flowers, ribbons, or other decorations to match your wedding theme.
It's important to note that willow branches can be heavy, so make sure to secure the arch to the ground or a sturdy base to prevent it from toppling over.
1、 Selecting the right willow branches
How to make a willow wedding arch:
1. Selecting the right willow branches: The first step in making a willow wedding arch is to select the right willow branches. Look for branches that are long, flexible, and have a diameter of at least 1 inch. You can find these branches at your local florist or craft store, or you can cut them from a willow tree yourself. It's important to choose branches that are fresh and pliable, as they will be easier to work with.
2. Preparing the branches: Once you have your willow branches, you'll need to prepare them for use. Remove any leaves or twigs from the branches, and soak them in water for several hours to make them more pliable. You can also bend the branches gently to help them become more flexible.
3. Building the arch: To build the arch, start by driving two wooden stakes into the ground where you want the arch to be. Then, take one of your willow branches and bend it into an arch shape, securing the ends to the wooden stakes with wire or twine. Repeat this process with additional branches, weaving them together to create a sturdy and attractive arch.
4. Decorating the arch: Once you have your willow wedding arch in place, you can decorate it with flowers, ribbons, or other decorative elements. Consider using flowers that complement your wedding colors, or adding a personalized touch with a monogram or other decoration.
In recent years, there has been a growing trend towards using natural materials in wedding decor, and willow wedding arches are a popular choice for couples who want to create a rustic or bohemian vibe. By following these simple steps, you can create a beautiful and unique willow wedding arch that will be the perfect backdrop for your special day.

2、 Preparing the base structure
How to make a willow wedding arch:
Preparing the base structure:
The first step in making a willow wedding arch is to prepare the base structure. This involves selecting the right materials and tools. You will need a sturdy base, such as a metal or wooden frame, to support the weight of the willow branches. You will also need a variety of willow branches, ranging in size from thin and flexible to thick and sturdy.
Once you have your materials, you can begin building the base structure. Start by attaching the willow branches to the frame, using wire or twine to secure them in place. Be sure to overlap the branches to create a strong and stable structure.
As you build the base structure, keep in mind the overall design of the arch. You may want to create a simple, minimalist arch or a more elaborate design with intricate weaving and decorative elements.
One important consideration when making a willow wedding arch is the location of the arch. You will need to choose a location that is both visually appealing and practical. Consider the size of the arch, the surrounding landscape, and the needs of the wedding party and guests.
Finally, be sure to take safety precautions when building the arch. Wear gloves and protective clothing to avoid injury from sharp branches or wire. And always work with a partner to ensure that the arch is stable and secure.
3、 Weaving the willow branches
How to make a willow wedding arch:
Weaving the willow branches is the key to creating a beautiful and sturdy wedding arch. Here are the steps to follow:
1. Gather your materials: You will need willow branches, pruning shears, twine, and a sturdy base for your arch.
2. Choose your location: Decide where you want to place your arch and make sure it is level and stable.
3. Create the base: Use wooden stakes or metal rods to create a sturdy base for your arch. Make sure it is firmly anchored in the ground.
4. Cut the willow branches: Use pruning shears to cut the willow branches to the desired length. You will need long branches for the main structure and shorter branches for weaving.
5. Begin weaving: Start by weaving the longer branches together to create the main structure of the arch. Use twine to tie the branches together at the top and bottom.
6. Add the shorter branches: Once you have the main structure in place, begin weaving the shorter branches in and out of the main structure. This will create a beautiful, textured look.
7. Secure the branches: Use twine to tie the branches together as you go. This will help to keep the arch sturdy and prevent it from falling apart.
8. Finish the arch: Once you have woven all of the branches together, trim any excess twine and branches. You can also add flowers or other decorations to the arch to make it even more beautiful.
In recent years, there has been a growing trend towards using natural materials in wedding decor, and willow wedding arches are becoming increasingly popular. They are not only beautiful, but also eco-friendly and sustainable. By following these simple steps, you can create a stunning willow wedding arch that will be the perfect backdrop for your special day.

4、 Securing the arch with wire or twine
How to make a willow wedding arch:
1. Gather willow branches: Start by gathering long, flexible willow branches. You will need enough to create the shape and size of your desired arch.
2. Create the frame: Begin by bending the branches into the shape of your arch. You can use a pre-made frame or create your own by bending the branches into a semi-circle and securing the ends together.
3. Weave the branches: Once you have the frame, begin weaving the willow branches in and out of the frame to create a solid structure. You can use smaller branches to fill in any gaps.
4. Trim excess branches: Once you have the basic structure of your arch, trim any excess branches that are sticking out or not needed.
5. Decorate: Add any additional decorations such as flowers, ribbons, or lights to your arch to make it more festive and personalized.
6. Secure the arch: Finally, secure the arch in place using wire or twine. You can attach it to a sturdy structure or use stakes to secure it in the ground.
It's important to note that willow branches are flexible and can be prone to bending or breaking. To ensure the longevity of your arch, consider using a more durable material such as metal or PVC piping as the frame and then weaving the willow branches around it. This will provide a sturdy base for your arch while still giving it the natural, rustic look of willow.


Leave your comment